Author Topic: The Ultimate Group Project - Concept art and Overall Design  (Read 42583 times)

Offline patreektherodian

  • Jedi Initiate
  • *
  • Posts: 472
  • I'm a llama!
    • View Profile
Re: The Ultimate Group Project - Concept art and Overall Design
« Reply #210 on: February 23, 2007, 06:13 PM »
The height is both pertinent because i need to know how high the cliffs are while the mural I would assume have fit with that height

Offline Ryan

  • Retired Staff Member
  • Jedi Master
  • *
  • Posts: 5884
  • Destiny is all
    • View Profile
    • JediDefender
Re: The Ultimate Group Project - Concept art and Overall Design
« Reply #211 on: February 23, 2007, 10:00 PM »
Hold on I'll have measurements for you in the next few days Patreek. ;)
"This is the way."

Offline Ryan

  • Retired Staff Member
  • Jedi Master
  • *
  • Posts: 5884
  • Destiny is all
    • View Profile
    • JediDefender
Re: The Ultimate Group Project - Concept art and Overall Design
« Reply #212 on: February 23, 2007, 10:06 PM »
Glass- I have to be honest, I’m not really digging the newest design. :-\

It feels small and kind of uninspired. I realize 9 x 6 isn’t a whole lot of space to work with given the scope we intended to have, but I think that we can better utilize what we have. Phruby did say he wanted 1/3 terrain and 2/3 City. You do have that exactly but it just doesn’t look quite right to me. The terrain looks really dull. It is a long straight 2 x 9 strip, with only a little curve in it to break it all up. It really isn’t very exciting. The curve is a start, but curves can be a real bitch, especially when a building contours with it, and the pieces may be made by two different people. Curves are going to be very tricky since we aren’t all building these together. And also cutting tile for that curve would be a pain in the ass. 4 x 9 is a very skinny stretch for the city too.  We wouldn’t even be able to fit four buildings across if they are any longer than a foot. Even three is a tight fit when you consider the amount of spacing that we would need for alleys and streets.

It doesn’t seem to be set up very well for viewing either. There really isn’t a good view where you can see both the city and terrain. You can either look at the terrain or city alone, which we should be able to, or look at both at the same time from two different sides. But the view of both is from the narrow side, and it will severely cut down on the visibility. Taller buildings will block a lot when there is up to 9 feet behind them. Granted we will almost always have that problem. I also don’t like that there isn’t a backdrop. We need a back drop somewhere to show that there is more to this world than a little 6 x9 rectangle. I think we can do better than that.

Don’t take offense to that, I understand that you have been busy with work so you may have been a little rushed. I know you normally do fantastic work; every other picture of yours in this thread proves that.
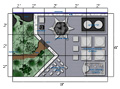
I went ahead and came up with my own ‘blueprint.’ This is just a basic sketch. I’m waiting on a few measurements from Justin so I can finalize the measurements and make a larger, accurate, official blueprint. Hopefully I can do that this weekend sometime.

I opted to make this one 9’ wide x 6’ deep as opposed to 6’ wide x 9’ deep like Glassman’s. There is a small area where the terrain is only 2’ wide but the angle cut makes the terrain look bigger than it really is. There is a point where it is 4’ wide. The Terrain is actually 16 sq ft as opposed to 18 sq ft, which would be exactly 1/3 of the total space. This gives us a tiny bit more room to work with in the city. And it also divides the terrain into four 2’ x 2’ sections (including the two triangle sections as one whole section) making it easy to divvy up. That city wall isn’t to scale in this blueprint it will end up being 3”-4” thick. The buildings aren’t to scale at this point either. They are just on there as rough estimates of their location. Because this is smaller than we originally hoped for I’ve nixed some of the buildings that were suggested in order to make room for the more important stuff.

I decided to add that small open-air market in there in place of a cantina. Little market stalls should be a lot faster to make than a large cantina complete with internal stuff.  I figured this was one of the buildings you wanted for a cutaway Brent? At this point I think we may have to just stick with almost all external stuff because it is already the 22nd of February. Adding cutaways and insides takes time, time we may not have. If you guys really want to do something like that though, PM me and we’ll see if we can make an exception. Anyways, I figure that little market is a good replacement because someone should be able to crank out a few fairly uniform stalls, and by placing it right in front there we should have a great place to display all our customs so they are easily viewable.

Since we originally wanted a spaceport but this space won’t allow for it I’ve added in a landing platform for Vader’s Imperial shuttle. Imagine the same type of platform that was seen on Endor. If we build and ship it modularly it shouldn’t be that difficult to achieve either.

I liked the idea of a Junkyard, so I went ahead and added it in. It should be fairly easy to accomplish. We just need to fill it with some beat up droids. If anyone has ship/vehicle fodder that they don’t want we could use it. And what ever else we need to fill it with can be from old model kits, painted hardware, plastic pieces, etc.

I didn’t notice a gate on your drawing Glass, I’m actually typing this offline since my internet isn’t working so I can’t really check at the moment though. I wanted the city and the terrain to have some kind of interaction rather than just sitting next to each other there. So I added a gate, if we are feeling ambitious maybe an opened and a closed version that we can switch out on different days. I also added the path and a Sentry post so it feels like the Empire does in fact go out of the city.

Patreek’s cliffs are on there in the top corner as well. Patreek I’ll contact you in the next day or two with exact measurements so you can get started. I’ll just have you make the cliffs for now unless you want to make the 2’ x 2’ square underneath there as well. If you do wait on that until I decide on the color of grass mat. I’ll have more specific instructions regarding the terrain construction as well. If you don’t want to make that part, I was planning on taking care of it. Patreek, if you are interested in making a few large boulders/rocks that we can place elsewhere on the terrain we can have you do that too. Let me know first though so I can tell you how many to make and the general size of them.

Here is the concept blueprint:


We will need to find out from Niub Niub where this will be located and if there will be enough walking room around the table to put up a barricade outside our 9 x 6 area or if we will have to cut into that a bit in order to fit a barricade.

I think that about covers it. Let me know if there are any questions regarding any of this, or anything else I didn’t mention. Once I get the Imperial Tower measurements the final blueprint should be up soon.
"This is the way."

Offline Ryan

  • Retired Staff Member
  • Jedi Master
  • *
  • Posts: 5884
  • Destiny is all
    • View Profile
    • JediDefender
Re: The Ultimate Group Project - Concept art and Overall Design
« Reply #213 on: February 23, 2007, 10:06 PM »
And now that I've see we have 9 x 24 this will need some reworking...
"This is the way."

Offline CHEWIE

  • Jedi Sentinel
  • *
  • Posts: 14630
    • View Profile
Re: The Ultimate Group Project - Concept art and Overall Design
« Reply #214 on: February 24, 2007, 01:30 AM »
9 x 6, I think is what we need to stick with at this point...

 :P

Offline Ryan

  • Retired Staff Member
  • Jedi Master
  • *
  • Posts: 5884
  • Destiny is all
    • View Profile
    • JediDefender
Re: The Ultimate Group Project - Concept art and Overall Design
« Reply #215 on: February 24, 2007, 03:44 PM »
Yeah I meant to say 'may' rather than 'will.' 9 x 6 should be good but in the event we have enough time we may be able to expand the city a bit.
« Last Edit: February 24, 2007, 03:51 PM by Ryan »
"This is the way."

Offline BrentS

  • Jedi Knight
  • *
  • Posts: 2788
  • I sense much fear in you.
    • View Profile
Re: The Ultimate Group Project - Concept art and Overall Design
« Reply #216 on: February 24, 2007, 08:10 PM »
Ryan,  I like your new design.  However, I feel like the areas are a bit to "separated"  I think we should try and find a way to combine what you and glassman have been working on.  I think we should do everything we can make the city look like it was built as sort of a "boom" town and have a variety in the footprints of the buildings.

I would like to see the open air cantina - that would be really cool.

As far as buildings and contruction materials.  I've been spending some time recently playing with Games Workshop LOTR miniatures.  One of the things they do is use a lot of extruded polystryrene (dense pink foam) as construction material.  I think we could use it to make some very good walls for the city.  I also that that may be a great way to make the flooring of the wooded areas.  We could also use the polystyerene foam as base for the city area.  It can easily be scored and textured.  The problem is the large size - it would have to be made in one or two large pieces and delivered in tact.  I've got some ideas and I can make another test scene if you are interested. 


Offline Ryan

  • Retired Staff Member
  • Jedi Master
  • *
  • Posts: 5884
  • Destiny is all
    • View Profile
    • JediDefender
Re: The Ultimate Group Project - Concept art and Overall Design
« Reply #217 on: February 24, 2007, 09:49 PM »
I think as far as the city floor goes we are going to go with tile still. It will save a lot of time, and we won't need to worry about them breaking during shipping. Add to that, that the tiles can be returned to Home Depot or wherever we get them from, so it will save some dough. We are also running short on time now so any test runs are kind of out at this point. We need to focus on the diorama itself.

I think for the wooded area floor the actual surface used under the grass mat isn't going to be that important. As long as everyone uses something that has a uniform thickness throughout and isn't too heavy (for shipping,) but is nice and durable, we should be alright. The foam you suggested Brent would work great because you can carve into it for negative terrain. I'm trying to figure out how thick to make the floor throughout the diorama. I've been working on UGP stuff all day today so I about have it figured out. We are going to be putting plywood or particle board under the city tiles to give ti more thickness, thus giving us more thickness to work with in the wooded area.

As for the wall, I'll let Justin use what he wants if he is the one that will be making the whole thing. The foam looks like it will work great, but foamcore does too and I think that is what he was leaning towards. Either one is fine really, as long as it is uniform throughout.

Ryan,  I like your new design.  However, I feel like the areas are a bit to "separated"  I think we should try and find a way to combine what you and glassman have been working on.  I think we should do everything we can make the city look like it was built as sort of a "boom" town and have a variety in the footprints of the buildings.

I would like to see the open air cantina - that would be really cool.


What exactly do you mean by separated? Just that there is a lot of space between building and they are fairly zoned off? If that is the case, I do agree that the buildings are a little sparse, I just kind of just threw a few on there since I didn't have the tower measurements and a lot hinges on that. We can add more buildings on once I get those measurements. Including the open-air cantina you are going to be making for me. :) I think we can fit that in somewhere in addition to the market. Building assignments will start once I have tower measurements. Other than that though, the overall size and shape of the terrain and city aren't changing. There is no more time for debating or extensive concept work. We have 88 Days until CIV starts. We need to get building.
"This is the way."

Offline BrentS

  • Jedi Knight
  • *
  • Posts: 2788
  • I sense much fear in you.
    • View Profile
Re: The Ultimate Group Project - Concept art and Overall Design
« Reply #218 on: February 24, 2007, 10:00 PM »
. Including the open-air cantina you are going to be making for me. :)

Ack!  What have I gotten myself into.  ;)

Anyway, yes my only comment is that in the layout that you provided there didn't seem to be very many buildings.  I think it will all come together pretty quickly.

Offline Phrubruh

  • Jedi General
  • *
  • Posts: 7847
    • View Profile
Re: The Ultimate Group Project - Concept art and Overall Design
« Reply #219 on: February 24, 2007, 10:44 PM »
Remember we have a little more than two months remaining. This thing should be 98% done by May 1st. 9x6 is the size we are working with. I suggest we get busy building.
This message brought to you by Wookiee Cookiees - "MMM... Chewie!"
Visit The Endor Express - The Ultimate Guide to Disney's Star Tours

Offline CHEWIE

  • Jedi Sentinel
  • *
  • Posts: 14630
    • View Profile
Re: The Ultimate Group Project - Concept art and Overall Design
« Reply #220 on: February 24, 2007, 10:45 PM »
Brent if you think you are going to have more time for the wall and want to try and take that on, we can discuss... I had planned on going to Home Depot to look at stuff and starting on it today, and then got dragged to a family gathering that took about 7 hours that I wasn't planning on going to.  :-X

 :P 

Offline BrentS

  • Jedi Knight
  • *
  • Posts: 2788
  • I sense much fear in you.
    • View Profile
Re: The Ultimate Group Project - Concept art and Overall Design
« Reply #221 on: February 25, 2007, 10:24 AM »
Brent if you think you are going to have more time for the wall and want to try and take that on, we can discuss... I had planned on going to Home Depot to look at stuff and starting on it today, and then got dragged to a family gathering that took about 7 hours that I wasn't planning on going to.  :-X

 :P 

To be honest, no I don't.  I think Ryan has me planning on me building the cantina and some other buildings.  It may be better for you to take on the wall. 

Offline CHEWIE

  • Jedi Sentinel
  • *
  • Posts: 14630
    • View Profile
Re: The Ultimate Group Project - Concept art and Overall Design
« Reply #222 on: February 25, 2007, 02:01 PM »
Ok, no worries.  I'll figure something out. 

 :P

Offline CHEWIE

  • Jedi Sentinel
  • *
  • Posts: 14630
    • View Profile
Re: The Ultimate Group Project - Concept art and Overall Design
« Reply #223 on: February 25, 2007, 05:05 PM »
Ok, went on a drive today and did a little research to see what my options are for the wall.

1) - Walmart/hobby stores have the foamcore I am used to using, and to make the wall it will require a lot of cutting/measuring/adding stability/thickness to the wall, adding some texture, and then painting. 

2) - One hobby store in my area that I know of carries styrene.  Not something I'm very familiar with, but I do know it's good stuff.  In the amount of time I have available this is really not a good option in my opinion.

3) - Home Depot carries insulation foam.  The thickness is about 1.5 inches, and it's a huge sheet for about $25.00, looks like it's 8 feet long and about 4 feet wide.  Probably more material here than I could possibly ever use.  The material is thick enough to not require adding much stability to it - it should be just a matter of cutting it into desired sections, then painting it.  I need to borrow my dad's truck to pick this up, the sheet is huge.  So that's my plan for next weekend - pick it up, and hopefully start cutting it into wall sections.  Then add a bit of detail, then paint with acrylics (probably several coats of course), do a black wash on it, then seal it with matte acrylic sealer spray. 

I'm definitely going to go with option # 3.  My plan will be to have the walls completed before April 1st.

 :P

Offline BrentS

  • Jedi Knight
  • *
  • Posts: 2788
  • I sense much fear in you.
    • View Profile
Re: The Ultimate Group Project - Concept art and Overall Design
« Reply #224 on: February 25, 2007, 07:09 PM »


3) - Home Depot carries insulation foam.  The thickness is about 1.5 inches, and it's a huge sheet for about $25.00, looks like it's 8 feet long and about 4 feet wide.  Probably more material here than I could possibly ever use.  The material is thick enough to not require adding much stability to it - it should be just a matter of cutting it into desired sections, then painting it.  I need to borrow my dad's truck to pick this up, the sheet is huge.  So that's my plan for next weekend - pick it up, and hopefully start cutting it into wall sections.  Then add a bit of detail, then paint with acrylics (probably several coats of course), do a black wash on it, then seal it with matte acrylic sealer spray. 


That pink insulation is what I was talking about.  I've been using it on my LOTR gaming terrain.  Here are some WIP shots from that:


It cuts really easily (but messy) with a utility knife.  I've been using a hot wire cutter to make cuts as well.


When I bought it, I just took a utility knife and cut it into 4 equal 2' x 4' sheets.  Then I could fit it in the car no problem.