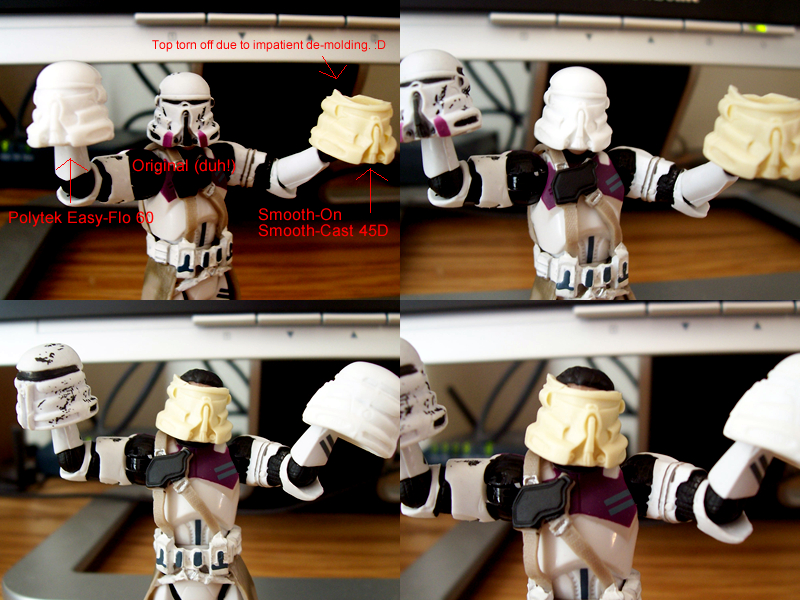
Show Posts

This section allows you to view all posts made by this member. Note that you can only see posts made in areas you currently have access to.


Messages - Ruprecht

Pages: 1 2 3 4 [5] 6 7 8 9 10 ... 24
61
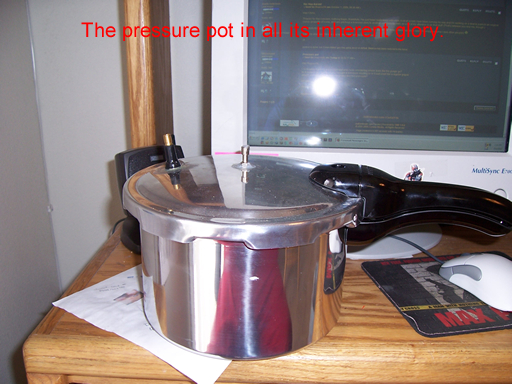
I use the pot for both the molds and for the casts.  That way the mold doesn't have any air bubbles, and produces better castings. 

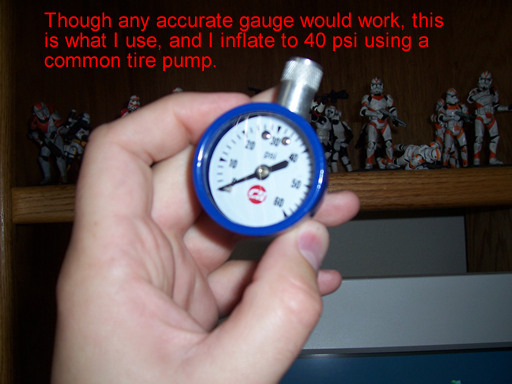
I keep the pot pressurized for about 30 minutes.  I don't really time it.  I just put the mold box or mold in, pressurize it to 40 psi, and walk away.  For the plastic and rubber that I use, 30 minutes is more than enough time.  Once it's started curing solid, there's no point in keeping it pressurized, because the air bubbles can no longer move.

62
Star Wars Action Figures / Re: Commander Keller pics anyone?
« on: November 7, 2006, 10:52 AM »
Thanks Strax!  :D

It's hard to find those semi-old comics, isn't it? 

63
I put the pot together sans instructions.  It was easy. 

Materials
Presto 4-quart pot
Tire valve
Clear silicone caulk

1.  The pot's lid has a plastic nub covering the hole where the tire valve goes --- remove it, and put the valve in the hole

2.  Seal around the valve with the clear silicone caulk

3.  Seal around the metal thing in the middle of the lid with the caulk as well

4.  You're ready to go!  Check the pot pics above to see what it looks like.

64
Thanks Straxus.  I went to Target's Customer Service desk and asked them to look up the Windu Squad by its DCPI number.  They said it wasn't on the floor yet, but they had some in the back, and they happily brought out a case.  I bought one for me, and one for my boys, and was I ever relieved!  I didn't get a Cmdr. Cody until about a month ago because I NEVER could find him in stores, and I refuse to pay $10 plus $10 shipping for one from ebay.

Quote
Was curious...one of the clones you got there looks like a fresh cast without any paint. Was it just painted over with white?

Yes, it, and the other ARC Gunship crew-to-be was spray painted white with Krylon H20, with a couple of coats of H20 primer underneath.  The ones I spray painted were done out of necessity, because when I was removing the original paint with Easy Lift-Off, it yellowed some of the plastic.  (make sure when using ELO that you have a bowl of water nearby to dip the figures in!)

The reason they haven't been finished is when I was done spray painting them, they all had a matte look and feel instead of the smooth sheen that clone armor has, so now I have to sand each one with progressively finer grit pads.  It takes a long time to do, so naturally I put it off until some other aspect of customizing frustrates me more.

65
Thanks, but I wish!  I've yet to sculpt anything other than accessories.  Someday I'd like to be as good as guys like Glass, Bantha5, Ben, Sith Fire, Owen, ae77, Hemble, and Smarty (that Verp is B-A-D-A-R-S-E), but I'm afraid that day is a looooooong way off.

Someday I'll grow a pair and try sculpting a helmet or a head.   ;D


66
Hehe, even after I was told what parts to use to build a pot, I was stumped, because I wasn't told HOW to build it, the process, etc.

I'm the kind of person who doesn't normally go very far experimentation-wise (a wuss some would say), because I'm afraid of screwing things up, wasting product, and therefore money;  But after a week or so of deliberating, I decided to order the pot, buy the parts and give it a shot.  What amazes me is how easy it was to put together. 

Until now all my head and helmet casts were bubble-ridden and useless, so you can imagine my excitement today at getting decent return on my investment.

67
Whoa I haven't updated in a loooong time!  Thanks for the comments guys.  Tonight's update is all stuff that has been started but not finished.  I figured while I was taking pics of my new molds and casts, I'd update some stuff.


68
Thanks gents.

Brent, I used a variation on Glassman's 1-part mold process.  Rather than attempt to describe it, there's a pic below.  I used a pressure pot for both the molds and castings, which I am very pleased with so far.  There are also pics of that below.

Jedistyle, I'm going to do a Commander Keller, and maybe some variations on the theme - helmet, head swaps, etc.

CC, thanks again!


69
Star Wars Action Figures / Re: Commander Keller pics anyone?
« on: November 6, 2006, 06:28 PM »
Thanks for the quick response.

I'm looking more for pics from the comics, rather than another customizer's interpretation of Keller.  My local comic book shop doesn't have any Republic series comics in stock, unfortunately.

70
Customizing Tips and Tricks / First successful helmet casts! Yay me!
« on: November 6, 2006, 05:40 PM »
Snagged a Mace Windu Squad pack from Target the other day, and just finished making my first casts of the airborne helmet.  These are actually my first really decent helmet casts ever, so I'm a tad excited.


71
Star Wars Action Figures / Commander Keller pics anyone?
« on: November 6, 2006, 03:23 PM »
The forum search keeps timing out on me, and google image search only turns up Keller's wiki entry.

Anyone have some pics of Keller from the comic series?  I just made a cast of the Parjai trooper helmet from the Mace battlepack, and I wanna make a Keller.

72
Thanks Glass!

Already have the pigment, so looks like I've got an order to make from polytek.

73
Fargin' awesome, Glass!

Do you cast those coins in plastic and paint them gold and silver?

Also, what do you use for the clear plastic casts and the tint?


74
1 cheap way to reduce air bubbles in your casts is to dust the mold with baby powder prior to pouring the resin.  For molds, follow Glassman's tutorial and pour the rubber s l o o o w l y.

Another way that I haven't tried yet is on Sarge's website, and looks like a good way to make fairly bubble-free molds.

I have been trying pressure molding/casting lately and have had good results so far.  All the equipment cost me about 60 dollars.  The only drawback to using a pressure system is it takes a lot more time to build a mold box, at least with the method I've been using.  This list of parts is what Master Gunzz recommended, and what I use:

Pressure Cooker:  Presto 6-quart - $45 with shipping from amazon.com
Tire Valve:  Generic brand - $3 at Wal-mart
Silicone Caulk:  Clear kitchen caulk - $4 at Wal-mart
Tire pressure gauge:  Generic brand - $2 at Wal-mart
Tire pump:  Any pump, I use the kind that stand up and you push up and down, as it'd take too long to use a small hand pump.

You take out the rubber stopper in the lid and put the tire valve in it.  Then you seal around the valve and metal piece in the middle of the lid with the caulk.  When you build the mold box and fill it with the rtv rubber, just place it in the cooker, close it, and pump it up to the desired pressure.  Bantha5 once mentioned that he pressurizes to 40 psi, so that's what I use and it works well.

As for the method I've used to build the mold box and cast the part, the guys at Goregoregore.com have some good tutorials with pictures and all.

75
Glad you're back DD!  Sweet pics of PPDK and all the celebs, but you didn't put one of you and PPDK "kickin' it," as they say. 

Pages: 1 2 3 4 [5] 6 7 8 9 10 ... 24