Show Posts

This section allows you to view all posts made by this member. Note that you can only see posts made in areas you currently have access to.


Topics - IncomT65

Pages: [1]
1
Toy Reviews / TBS #14 6" Clone Trooper (Phase I / AotC) - review
« on: August 14, 2014, 06:31 PM »
The promo pictures of the Black Series #14 6" Clone Trooper (Phase I) got the better of me and persuaded me to order a pair from an Asian eBay seller. Overpriced, but still cheaper for me than buying them from our own Dutch (r)etailers. I received them in pristine condition and within a week after payment.

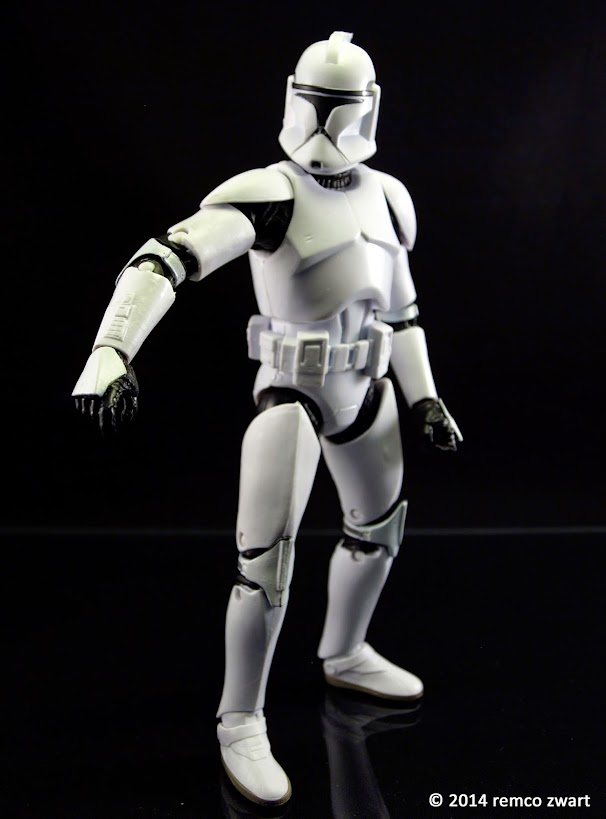
Sculpt: at first glance the trooper looks a bit bulky. But after eyeing him more closely, the sculpt is really decent. The black body suit has a few folds, all in the right place. It also features a subtle texture. The body armour is pretty close to the mark, as far as I can tell. The belt is very well detailed (and on my troopers positioned correctly :p ). Details on the helmet and on the panel on the back are crisp and clean.


Paint: safe for the body suit, the standard Phase I grunt is white, of course. However, Hasbro applied subtle paint apps on various details, such as the back straps of the knee pads, the soles of the boots and of course the helmet. But they didn't apply it in a very tidy manner. On each of my two figures, I could spot numerous areas where the paint just missed the edges of the details. It's like decals applied just off centre. This has fast become a trend in Hasbro's figures, from 3 3/4" to 6" scale. Hopefully, this will be addressed soon. The 6" figures still are action figures and we can't really expect Sideshow, Hot Toys or Gentle Giant quality paint apps on a $20 figure, but a little bit more effort isn't too much to ask, I think. Lastly, I think it's strange that the body suit has a semi gloss finish, while the visor is flat black.

Articulation: the Clone Trooper has 14 points of articulation: ball jointed head, shoulders, wrists, waist and hips, double jointed elbows and knees and rocker ankles. This allows for the trooper to be placed in many positions, but I have found serious limitations as well, due to the way certain areas were sculpted.

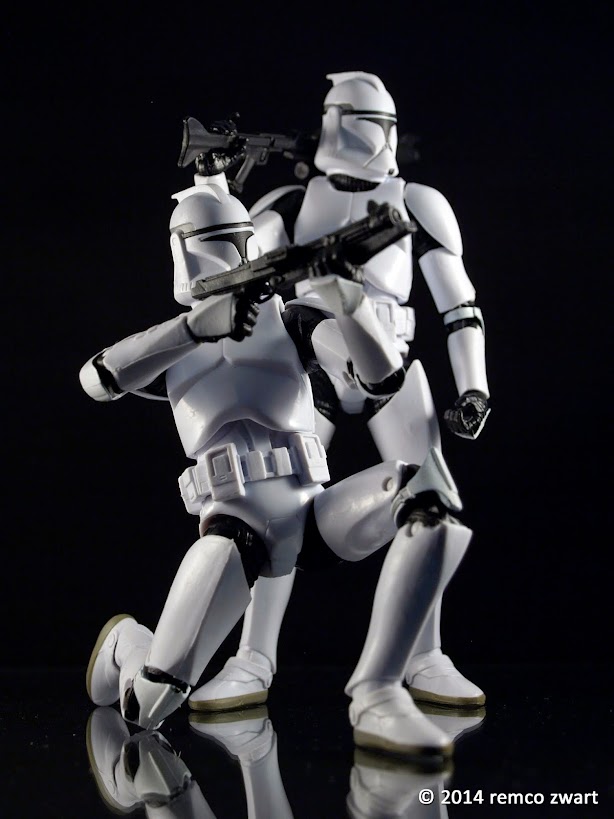
In the next picture I have marked the areas which limit articulation. My biggest gripe is that the head can look down perfectly, but hardly up. Not at all, as a matter of fact. This is caused by the back armour. Another area of concern are the elbows. Again, the armour makes it hard to get some really cool blaster handling or signaling positions of the arms. The same goes for the thighs, making kneeling positions a bit awkward, although I did manage.


The shoulder armour is a real pain. Look at this picture: this is the maximum lift of the arm. Ephialtes, hello?!


 It's a matter of sculpt accuracy versus posability, I guess. As a customizer, I have already thought about taking care of some of these areas. Shouldn't be too hard and yes, sculpt accuracy will be lost somewhat, but I'm willing to accept that.

Accessories: the Clone Trooper comes with a whopping two accessories, namely his trusted DC-15S blaster and the larger DC-15A blaster rifle. Both are finely detailed, but lack any kind of detailed painting. On top of that, the blasters are made of the softer type of plastic. The blasters are straight, don't get me wrong, but I prefer weapons to be molded in hard, unbendable plastic.

It might come across as if I don't like this figure at all and I must admit, when I had just unpacked them, I was a tad disappointed. But having handled them extensively for the photoshoot, trying to pose them in various positions, the Clone Trooper has already grown on me. A lot. In that I need more. With some careful modifications, these can go from nice looking troopers, to pretty darn good ones. If you have the space, it's definitely an army builder and being all white, an excellent template for making your own Clone officers. Except for the sarge, because Hasbro has him already lined up in a future wave.


2
Modern Classifieds / Mr. Black's sales/trades - Clones added!
« on: August 12, 2014, 09:33 AM »
More clones added, sold items removed. Prices in the pictures.

http://s740.photobucket.com/user/incomscustoms/library/For%20sale

Battle Droid in flames $4
R4-D6 (I think?) $6 each
CW R2-D2 $3
Tri-Droids: $4 each
CW Super Battle Droids: $3 each
Treadwell Droid: $2

Moff Trachta: $5 each  3x PENDING
CW Clones $4 each (white and green)
ROTS Phase II Clone: $4

Shipping has changed: first figure is $5, for every additional figure add $1, worldwide. Does not apply for the tri-droids, ask for a shipping quote on those.

PayPal required, gift payment if you're comfortable with that. If not, regular payment will do just as well, fees are on me, of course.

Thanks!

3
Collections / Mr. Black's Man Cave: makeover 2014 - update 08/26
« on: July 22, 2014, 04:55 PM »
Back in 2008 I had this idea to seriously take on reorganizing my 'man cave'. It's my own little room, where I have my collection on display and where I practice the fine art of customizing. It's a small room of 2m. x 3m. (6ft. x 9ft.), but it's mine. Mine!


Fast forward six years and I've finally started the makeover! Here's a series of photos showing the progress.


These two 32" Billy cabinets feature part of my collection and some random stuff as well. It all looks a bit sloppy. I was never happy with the way the cabinets met in the corner, but due to the size restrictions of the room, there wasn't another way of placing them.


Panning to the left you can see my customzing space:


And here I've disassembled one of the grey Billy cabinets and assembled the first two of four 16" Billy cabinets:


Another Billy and a Benno CD case waiting to be assembled:


This shelf above my workbench has to go, otherwise I can't fit all the Billy cabinets:


I don't have a big collection, but man, even a small collection consists of a lot of stuff. I'm just glad all of my action figures are packed away in bins in the attic:


This is a quick setup of the first three Billys, enabling me to maximize the use of the corner. Of course, there's quite a bit of empty space behind the middle cabinet, but that can be used perfectly for hiding the wiring of the lighting inside the cabinets:


Here's a test fitting of the LED strips:


 I'm not sure what looks best: one on top and one on the bottom shelf, or two on top and two on the bottom. If only one, should I place it in the back, middle or front?


My girlfriend mentioned finding a mural or wallpaper of a starfield and applying that to the back and/or inner sides of the cabinets.


*** update 07/25 ***


I installed all of the LED strips and guided the cable through the back panel of each Billy:


The back panel of the Benno CD case hasn't been fixed with nails, as one would normally do. Instead it just sits loose, held in place by this metal plate.


This knob allows me to slide up the back panel of the Benno CD case, so I can reach the switches of the LED lighting units, that lie behind the Benno case....


... as demonstra-.... what the... ?!! Jawas?! I can't abide those disgusting creatures! Oh well, at least it's not a flock of mynocks!


*** update 08/05 ***


Ikea has tiny covers for the countless small holes in the sides of their cabinets. Had a little help from my girls plugging those in. 400+ of those things!


Installed four Morebo glass doors and placed a lot of my collection in the cabinets. You can still see a couple of wooden shelves, but I have already bought glass ones to replace those too.


But first I will take care of the other side of my room. On this side I will set up three 42" high / 32" wide Billy cabinets with a Benno cd case between each pair of Billys. The Benno cases will be cut to size, since these don't come in 42".


I've decided this side will feature my action figure collection of vintage Kenner SW figures and their best modern counterparts.

Although I've put in quite a bit of money so far, I'm pretty proud of my timing. Ikea has replaced their old Billy and Benno cabinets with newer models, so the older models were all on sale. Safe for the 42" Billys, it's all old skool Billy and Benno what you see here. Another advantage is that additional products (such as the glass shelves and Morebo doors) were also on sale, up to 50% off!


*** update 08/26 ***

Never realized placing 180+ figures neatly in a row could be so time consuming. It was much easier to just throw them in a big bin :D But I have to admit, it's very satisfying seeing all these on display.


On top you can see a small Ikea Ribba frame, that holds 24 mini figs. I don't have that many mini figs yet, but it's on my list.


These are four mini posters from a very old set, published by Zanart in 1994. I'm looking into replacing these frames with one giant mural, preferrably a battle of Hoth one, or a scene from Tatooine. A space battle would be really cool, but I like to keep my room light.


4
Modern Classifieds / WTB: various TLC/TVC, etc.
« on: March 22, 2014, 06:18 PM »
I'm looking to complete my "Kenner vs. Modern" figure collection. I have nearly every basic Kenner figure in C8-C9 condition and over time have acquired quite a few of the 'best' modern counterpart. Scott from JD.com set up this awesome feature Collect All 92, but unfortunately he hasn't been able to update it for quite some time now.

Nevertheless, it's some sort of a guide for me. I am therefore looking to purchase the following figures, loose but complete and in mint condition, of course:

Luke Skywalker (Stormtrooper Disguise): TLC Luke in ST Disguise

Princess Leia Organa (Bespin Gown): TVC Bespin Leia pending

AT-ST Driver: Endor AT-ST Crew Member

8D8: POTF2 8D8 pending

EV-9D9: POTF2 EV-9D9

Squid Head: POTJ Tessek

Han Solo (Carbonite): Saga '06 Han in Carbonite pending

Luke Skywalker: Resurgence of the Jedi Luke pending

Ree Yees: Black Series pending


Let me know if you can help me out. I live in the Netherlands, prefer 1st Class International Airmail and can pay through Paypal.

Thanks!

5
Star Wars Dioramas and Displays / Wookiee vs. Trandoshan diorama :p
« on: January 19, 2012, 02:27 PM »
I've had this idea of a Wookiee mangling a Trandoshan and recently got around to making this little dio. Hope you guys like it, I had a great time creating these two :cool:

The Wookiee:


Made from a ROTS Wookiee Warrior with quite a bit of Fixit sculpt and custom made melee weapon


The hapless Trandoshan:


Made from a VOTC Bossk and 25th. Ann. Wraith parts.


The mini dio:


Let me know what you guys think ;)

6
I didn't plan to start these before December, but since I had a batch of Fixit mixed, I thought what the heck and took a Ki-Adi Mundi head, sanded the sides and rear smooth and voila! Early WIP shots of the head sculpt for the Brothers, featured in the ultra cool video game Afro Samurai.

For reference, I turned to the wonderful galleries of CreativeUncut.com:

http://www.creativeuncut.com/art_afro-samurai_a.html


7
Modern Classifieds / WTB: TVC /TLC, horses...
« on: August 8, 2008, 10:06 AM »
Following the awesome "Collect all 92" feature and it's time for me to update my vintage Kenner collection with their modern counterparts. WTB the following in loose, complete, mint condition:

TVC - Gamorrean Guard
TVC - Echo Base Trooper
TVC - Darth Sidious (multiples)
TVC - Weequay Skiff Master
TVC - Ponda Baba

TLC - Ten Numb or Nien Nunb (B-Wing Pilot)
TLC - Leektar (will buy multiples)
TLC - Resurgence o/t Jedi Luke Skywalker

POTJ - Tessek

Any 3 3/4" scale action figure horses, like from the Indiana Jones and Prince of Persia lines.


Additional info: residing in the Netherlands, prefer 1st Class Int'l Airmail, payment through Paypal ('gift' is not a problem).

Thanks!


8
Customizing Tips and Tricks / Photography: self made lightbox
« on: July 18, 2008, 05:26 PM »
I just made this handy lightbox. Thought I'd share and maybe it's something to add to the tutorials?


It can be folded up neatly like this:


And here's a shot of Ordo-in-a-box:


Here's what I needed to make this:

Ikea Dröna storage box (about $6);
A white blouse that needs to be replaced anyway or any other piece of thin white (cotton) fabric;
Double sided tape (the stuff you use to tape carpets and such on the ground);
Three desktop lights. I used two (from left and from above), because I don't have a third yet, but as you can see that too gives a nice effect.

Before taking this shot of Ordo, I manually set the white balance on my camera (the 2nd from the top in this pic by pointing the camera at a sheet of white paper in the box. This way the camera know what is white under these particular lighting circumstances.

-Incom

9
Modern Classifieds / WTB: TIE Fighter w/large panels
« on: April 9, 2008, 03:59 PM »
OK, I just received a POTF2 (or Saga or whatever) TIE Fighter and I knew the panels were undersized, but now that I have it for real, I must say, those things are really way too small.  :P

Anyway, I'd like to have a TIE Fighter with large panels. I know it was a Target/TRU Exclusive, and it's not that abundant on eBay, so I hope someone on the boards has one he/she wants to part with.  :)  Shipping (to the Netherlands) will most likely be pretty steep, but I can live with that.

Let me know, ok?

Thanks!

- Incom

10
Feedback / Outrider's feedback
« on: September 27, 2006, 12:28 AM »
Outrider delivered some excellent self made kamas! And fast too! Add 1 for him, please!

11
Here's how to make a D-ring for your figure's lightsaber hilt. Initially from FFURG, but instead of superglueing the D-ring on the hilt, I prefer making one through the hilt. This allows for free movement of the D-ring, which makes it easier to let the saber hang more naturally of your figure's belt.

These are the main supplies for making a D-ring: a lightsaber hilt, a push pin, the paper clip from making the removable blade and a tie strip (the ones for tying up plastic garbage bags, sandwich bags, etc.):


Push the push pin firmly in the saber hilt. Not all the way through, just enough that it stays in:


Remove the pin and heat up the paperclip over a flame. Let it become quite hot. Better hold the paperclip with plyers. Push the hot paperclip firmly in and through the hilt at the spot where you pushed the pin in. Then remove the paperclip:


Strip the tie strip of it's plastic and loop the metal thread twice through the hole in the hilt:


Place a round object (like this pick, a toothpick, the blade of the lightsaber, depends on how small/large you want the D-ring to be), in the D-ring and pull both 'loose' ends tightly:


Using a wire cutter, cut off the loose ends as close to the hilt as possible. What I did was tightening the D-ring a bit more, cut off the ends and remodel the D-ring with the pick:


Push a pin in your figure's belt and superglue another piece of paperclip in that hole. After the glue has dried thoroughly, bend the paperclip in a 90+ degree angle and cut it off to the right size. You might want to make the point less sharp:


There you have it. This is quite easy to do, but it adds much to your custom.

- Incom

12
FFURG has a text-only tutorial on how to make 'fixed-blade' sabers into sabers with removable blade. I pretty much followed the entire procedure, but took some pictures to make things clearer. Here goes...

Take your 'fixed-blade' of choice:


Cut the blade off precisely at the emitter. Using a pick or a push pin, make holes in the blade and the hilt, in a manner that the holes are at the same position on both parts. Do this very carefully, by gently but firmly twisting the pick/pin in the parts. Only has to be 3 or 4 mm.:


Take a paperclip and superglue one end in the blade:


Cut off the paperclip so that the 'peg' in the blade is too long. Place the blade in the hole in the hilt and mark where the peg enters the hilt. This way you know how deep the hole in the hilt is and how long the peg has to be. I just held my thumbnail on the spot and eyeballed the length:


Place the blade in the hilt and check if it doesn't fall out easily. If so, drop a little superglue on the peg, put it in the hilt and very slowly turn the blade until the glue starts to settle. Familiar to tightening joints, not unknown to you, I'm sure:


That's all there is to it  :)

-Incom

13
Well, I joined recently, might as well showcase my second Galactic Marine, which I finished last night.

Personally, I think I could've gotten around the pauldron a bit tidier. I'm exceptionally pleased with adding the head and with the kama on this one. I named this one 'Scar', because of the little slip of the exacto knife on his helmet, while removing the Snowtrooper's rim. And yes, a customizer was hurt in that process  ;). I also made a scar on the clone's face, above his left eye.


Let me know what you like and/or dislike? I'm planning on making more of these, and I believe each should be an improvement over the other  :)

14
Newbies / Newbie from the Netherlands
« on: June 15, 2006, 03:29 PM »
Hi everybody!

Just registered here at JD after having read a lot of topics for the last couple of weeks, mostly in the customs area.

I'm a 32 y/o Dutch SW fanatic and have been since oh...... long before some of you were born (since late '83, actually  :)). I have a loving g/f and a beautiful 10 month old little girl. I work at an accountancy firm, play guitar, collect SW items like figures, GG statues/maquettes, da movies/cartoons, tpbs, novels, etc. My main goal is to complete the vintage line of figures (loose) in good/vg condition. A mini-focus is collecting vintage Snowtroopers and Royal Guards.

I also like to watch F-1 races, movies, listening to music (preferrably with guitars), attending concerts/festivals, hanging out with my friends.

I have been a long time member at the TF.N forums and joined TheJawa.com when I decided to make a custom figure. And now I'm hooked on that. I'm boiling and popping heads and arms and buying every colour of GW Citadel's line  ;D I'm also a (new) member at FFURG, Wampa's Cave and Galacticarchives, all because of the customizing scene.

I'm positive I'll have a great time here and will get things organized, so I can show my customs in a decent way!

- IncomT65

Pages: [1]